Friday, December 7, 2012

Join the Pergola Building E-Course


For anyone even thinking about building a pergola, this FREE 3 week series of email lessons is exactly what you need to get started. 

The E-Course takes you from the very first step in the planning process all the way to heading out to shop for materials with your very own cut list and freshly drawn pergola plans. 

You will learn how to measure out and prepare and mark your site, find out how to obtain permits and meet all local regulations that are needed, and then exactly what you will need to do to secure your posts to any possible surface.

You will receive a free pergola plan, but then also learn how to adapt the one you receive in case it is not the exact size and design that you need. You will also learn how to draw your own pergola plans from scratch including figuring out dimensions all around and then using that to create a material cut list.

At that point you should really be able to feel confident about how possible and easy it it to build your own pergola. Then you will be ready for the second part of the lessons - the ebook that provides illustrated step by step instructions on getting to the final product - your very own personally designed and built pergola.

Sunday, December 2, 2012

Securing a Pergola to a Deck


On the topic of where to build a pergola, this question very frequently comes up:

“How do you build a pergola on a deck that will stay secure under windy conditions? We live in a hurricane zone and we’ve seen pergolas that crumble and other’s that stand strong. What’s the key to keeping them secure?”

It is very important to properly attach pergola posts when installing a pergola over a deck. As the customer shows, a main concern is how the structure will react under high wind conditions.  Most deck builders bolt pergola support posts to the frame of the deck using (2) 1/2"x6" lag screws with washers per post. The key there is to attach the posts to the frame. That is the only part of the deck that can provide the stability to hold up any kind of attachment to the deck. This technique is the same as attaching a rail post.  

Another way to insure stability is to build the pergola with some additional bracing pieces that increase resistance to wind. Pergolas are top heavy and can sway in the wind without lateral bracing and can experience strong uplift forces as the pergola acts as a sail.  Attaching sections of rail in between pergola posts will strengthen the pergola.  Installing 45 degree bracing in between the post and header beam will also increase stability. 

For just about any design or foundation, we always suggest using 6x6's for support posts, but for a deck we consider it mandatory.  Deck Lok brackets are another option for extremely windy areas and hurricane zones.

Sign up here for an outstanding Pergola Building Preparation E-Course that will make sure that you learn and follow all the best steps to building the perfect pergola for your yard that will stand the test of time (and wind!)

Monday, November 19, 2012

Pergola design with a canopy


Here is a note we recently received from a curious visitor to the site:


"Is it possible to build a pergola with a canopy?  I just staked out where we want to put a pergola and it is the sunniest possible spot in the yard. I think I will definitely want some sort of adjustable solid shade function for hot summer afternoons.

I’ve seen pictures of pergolas with pretty yellow or orange canvas shades. That would actually be a really vibrant accent to have there. It will be a nice, unexpected splash of color to liven up the area. Since we are putting it up to provide shelter over a backyard sitting area, the shade function is actually pretty critical. Of course, thanks to other obstacles like water lines and such that is really the only place we can safely dig to install everything."
 This is a great question and allows me to share this photo of one my favorite pergola design additions. Retractable canvas canopies are inexpensive and easy to install on any pergola. Build the pergola with the design you need and in the location you have chosen and then add on the canopy. As the writer says, they come in some very stylish colors that can really add to the overall beauty of the space. And of course, the important function is the shade providing a more complete shelter from bright sunshine as needed. When you want the light and warmth? Just roll the canopy up as you would a set of window blinds.

So don't let the fact that the best spot for your pergola is also the brightest and hottest especially in the summer. Just add a colorful canopy and enjoy!

Thursday, October 25, 2012

A pergola, arbor, trellis or gazebo?


A customer wrote in asking to help them identify the differences between pergolas, arbors gazebos and trellises. They knew they wanted to add a structure to their yard that would provide shade but were not exactly sure what it would be called. Since we hear this question frequently we thought it would be good to summarize it here.

Arbors and trellises have a bit in common. They are not actually structures with roofs at all or really designed to provide shade for a seating area. Arbors are usually built to designate a transition between two places in a garden. You find them over walking paths sometimes with vines growing over them. A trellis is a one dimensional structure that is designed entirely to support plants and vines.

Gazebos are nearly complete outdoor rooms in that they have full roofs and also floors. They are typically round with solid walls at the bottom containing built in benches for seating. The upper half of the walls is open. 

A pergola is more like what this customer really wanted. It is an open structure with a roof that would provide shade, but is not solid. There is also no floor but rather the posts supporting the open roof would be secured into the ground or on a concrete patio or a deck. 

For more in depth descriptions and pictures of each, go here. If, like the customer in this story, you decide that you want to build your own pergola, then submit your email there and claim a free pergola plan. You will find everything there you need to add a pergola to your yard.

Thursday, October 18, 2012

There is Really No Reason Not To Build Your Own Pergola


Everywhere you look the advice seems to be that you should build your own pergola rather than buying a prefabricated kit or hiring a contractor to build it for you. There are so many resources to guide you through the process.

It is certainly a lot less expensive to do it yourself. You might even shoot for a higher grade material or adding on some options to increase the value of the finished product. All you need is a circular saw, a power drill, hammer, nails and then some fastener brackets. Of course, a ladder, leveler and another pair of hands to assist would be quite useful too. Even attaching it to your house is really quite simple.

Check out the information in the Build a Pergola section of the PergolaDIY site, take the survey, get a free plan, learn from the email series and then buy the book. 

As long as you feel comfortable using the tools mentioned then it really will pay off to build your own pergola. 


Sunday, September 30, 2012

The Popular Pergola


My sister just bought a former model home that has a beautiful detached pergola in the sunniest corner of the yard. The pergola defines a space that has become their favorite place to sit as the summer evenings wind down.

She has now noticed that there are pergolas everywhere. You know how it goes - once you learn about something that appeals to you specifically you start to notice them all around you. She now understands why we have always been so interested in these outdoor structures!

Test yourself over the next week or two. See how many pergolas you can spot as you drive, walk, bike, or run around your neighborhood. Don't forget that pergolas can be attached or detached and come in a variety of shapes and colors. There are also many installed above front yard gates or in larger side yards to provide shade. See a lovely wisteria vine? Check to see if it is climbing along the roof of a pergola.

Once you notice them "in action" so to speak - then you will be really focused on figuring out how you can build a pergola in your own yard. That part is easy. Check out the information in the Build a Pergola section of this site, take the survey, get a free plan, learn from the email series and then buy the book. Then, like my sister, you will be loving the new favorite spot in your yard!

Monday, July 16, 2012

Getting Started Building a Pergola


Like many people these days you have decided that it is better to improve your home than to buy a new one. This summer it seems that every other house on my street is undergoing some kind of renovations. New roofs, walls, landscaping, driveways, gates, windows and painting are all getting done. The stagnant economy is keeping people where they are, but there is still a desire to improve and upgrade where you live. For a lot of you that means starting out with something simple that you can do yourself such as building a pergola.

Where will you place your pergola?

You’ve decided to build a pergola and create a shaded spot for an outdoor seating area. Most houses already have a concrete slab patio or a deck in the yard. Perhaps you have a flagstone or paver patio. Or maybe your yard is just all lush green grass. In any example you can easily secure pergola posts and build the structure anywhere you choose. A pergola can very easily be attached to the back of the house or be free standing. Create your seating area or outdoor kitchen where you can have the most privacy or to take advantage of the nicest views from your yard. 

Securing the posts to concrete

Since most people have a concrete slab off the back of their house creating a natural patio seating area, securing pergola posts to concrete is the most common and easiest method. Attach brackets to the concrete with tapcon screws and then secure your posts in the brackets. This method is perfect not only because it is sturdy but also because the brackets create the recommended one inch gap between the bottom of the post and the slab so that water won’t accumulate. 

What if you need to dig?

For yard with flagstone pavers or no hard surface patio at all, you will need to dig holes. Pavers are not strong enough for securing a pergola. Remove the pavers from the place where the posts will be and dig a hole. You will need to dig below the average frost level in your area to prevent frost heave - which happens as the ground freezes and then thaws - from pushing your pergola out of the ground. Pour concrete into the hole and then place Simpson strong tie brackets at the top making sure they are all level. When the concrete dries secure the posts to the brackets. 

Deck pergola installation.

The key to securing pergola posts to an existing wood deck is to use the framing as the attachment spot. You cannot just add a post to any single floor board because they may not bear the weight. Blocking needs to be added to the deck floor if that is your only choice to help spread the load. A metal anchor should be used as a mounting bracket for the posts.

Consider a pergola kit if you have a little extra money

Pergola kits are excellent alternatives to building your own. They are all pre-fabricated and partially put together in easy to ship sections. They come with complete instructions for you to follow. All the hardware necessary to secure your pergola to any surface will be included. You simply need to let the manufacturer know what you need. You will need one person to help you, but it will take much less time and effort than building from scratch.

Whether you choose a pergola kit or decide to build your own pergola, you will be very happy with the results. Pergolas are inexpensive and easy to install. Just one weekend of work and you will have added style and value to your yard. You will enjoy the pergola for many years.

Tuesday, July 10, 2012

Let's Talk About Pergola Permits


Before you get too far into planning your pergola building project, you must look into the possibility of obtaining a pergola building permit. Building permit applications are granted by your city building commission. Every city planning department has a section that handles building addition permits and they all have pages on their websites that can let you know if you might need to get one for a pergola.

Chances are about fifty fifty that you will need one. Some cities look at the simplistic design, lack of walls and complete roof and are note concerned. Others look at the fact that people will be sitting under the pergola or cooking or placing plants to grow on it and want to make sure it is built to carry it's load and not buckle or topple in bad weather or under normal wear and tear.

Don't stress if you do need a permit. All you need to do is sketch out where it will be on your property, fill in the dimensions and let them know exactly what type of wood or other material you will use. In other words, you just need to give them your pergola plans that you will be following.

There will be a small fee to apply for the permit. Again, it varies by city, but of the ones that want you to obtain a permit, some may then require a final inspection after it is done to make sure you followed everything you said you would in the application.

Do take the time to check! You don't want to find out after that you violated a regulation and have to tear it down. That will cost you a lot more money and hassle than the simple application process will!

Sunday, July 1, 2012

Fun with Pergola Roofs

As you think about the pergola design you would like to build in your yard, keep in mind how the roof will look from all sight lines.  Consider too, just how much shade you want it to provide and what is the best placement for you to take advantage of that shade from all possible sunshine angles. It can be quite easy to overlook the many details of your pergola roof but you really don’t want to fall into that trap!

In the photo above this redwood pergola rafters and slats are the same two inch width. This provides a uniform square pattern on the ground that is very appealing to the eye in combination with the concrete pavers. The slats are also placed quite close together to increase the shaded areas. While increasing the slat and or rafter count will increase the overall costs of the pergola, if the ultimate goal is to cool off a particularly hot and sunny spot, then it will be worth the small increase.

You should also put up some construction stakes and line to give yourself a preview of what your pergola will look like before you get started. If you have a two story house you want to get an idea of what a view like the one above would look like. Will the pergola roof block or distract from any existing views that you want to keep? What about your nearest neighbors? If there are no local home owner’s or permitting rules instructing you on height or view blocking limitations, you should still be a courteous neighbor and try not to build anything that will be an eyesore.

Finally, you should go an sit out where you want to build your pergola if the area is to be designed for seating. Look around you and see what your views will be like. Look up and see who is potentially looking down on you! What will the wind be like in that spot? Will you perhaps want to put up a partial lattice wall on any particular side for either privacy or wind protection?

 If you take the time to think about all these little details you will be even more happy with the pergola design you choose. Better to layout and preview your pergola plan twice, and only build it once than the other way around!

As always, for the best darn email tips and instructions on how to build a pergola, visit PergolaDIY.

Monday, June 25, 2012

Pool and Spa Pergola Ideas

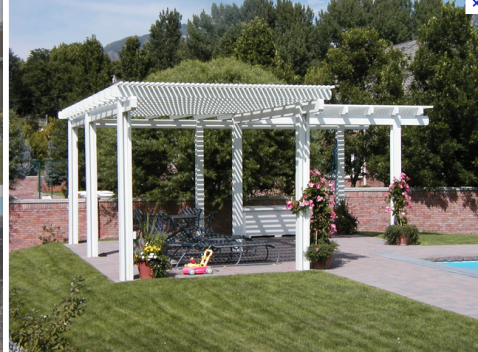
Poolside Pergola - Corner Design
Vinyl Poolside Pergola – Corner Design

As you make your way around your neighborhood or the internet in your search for pergola plans and ideas for different possible designs, you might notice that they are quite popular structures to place around back yard water features. You can get very creative when thinking about where to place your pergola and what shape and size to use. The example above is a corner wrap design. It almost looks like two separate pergolas but the roof pieces do connect in the back. It is still a very simple design though with standard square posts on concrete, and single layer beams, rafters and slats. The overhang is quite short and end cuts are very basic.
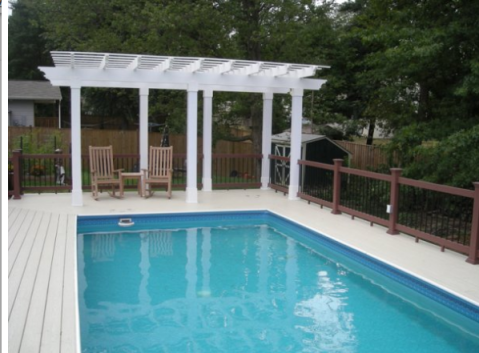
Poolside Pergola - Rectangle six post design
Vinyl Poolside Pergola – Rectangle Six Post Design

You will notice that the majority of waterside pergolas will be made with a white vinyl material. This is the best type for withstanding the excess moisture of a pool or spa. It is a little more expensive at first, but then upkeep is minimal with no cost. Just hose off the pergola to keep it clean, but you wont need to reapply stain or treat it. The pergola above on a deck at the end of the pool is designed to match the pool’s rectangle shape. Six square posts are secure to the deck. Again the roof design is simple though the edges of this one have a more sharply angled cut and longer overhang.


Cedar Poolside Pergola – Four Post Simple Design

There are times, of course, when wood is just what you happen to want and it also looks beautiful at the edge of a pool. The area surrounding the pool in this yard is a perfect compliment to the cedar pergola. The four post design is attached to the concrete with some nice base trim pieces and supporting knee braces between the beams and rafters that provide a more complete, elegantly curved look. The roof line is again, otherwise quite standard with just one layer of rafters and slats to provide just the right amount of shade for the seating area.


Curved Poolside Pergola

This pergola design is something you typically see at a resort. It is just there for style and does it ever work! The curved vinyl design set up on pillars provides a very regal boundary at the edge of the spa and pool seating area. There is no real shade being provided here since it is just a single line of posts holding up a minimal series of rafters on the curved beam. Extended trim pieces at the tops of the posts deliver additional style and support for the beam and rafters.


Simple Attached Vinyl Poolside Pergola

Bringing it back to a more useful example – the attached vinyl pergola above is a classic. The roof line is again quite simple, but the slats and rafters are cut a little thinner than usual and placed closer together to provide more shade.


Attached Vinyl Spa Pergola

Spa pergolas are truly inexpensive and easy to build. They typically have to cover a much smaller space such as the one above. The attached pergola with two square posts attached to the concrete only has 7 slats and 7 rafters so the material cost is quite low. The labor to build this would also be minimal. Two people could most likely put it up in one day.


Pine Wood Spa Pergola

Just like with pools, sometimes you still want to see wood around your spa, Pressure treated pine is the cheapest and as long as you are willing to spend a day every few years re-treating the wood it will last just fine. This is a very simple, four post square pergola with nice, thick roof pieces for maximum shade. This one could also be put up in one weekend by two people quite easily.


White Vinyl Spa Pergola with Deck

The spa pergola above is a little fancier than the others of course. This is a beautiful blend of different materials for the deck, fence and pergola. The posts are actually secured in the ground between flagstone pieces. You cannot properly secure a pergola on flagstone as it doesn’t provide sufficient stability. It’s best to remove the stone to dig holes for the posts. There are nice trim pieces added here on the posts and the top and the bottom including caps to match the fence posts. Like the previous two examples there is only one row each of 7 rafters and 7 slats so the basic pergola itself would not cost much more in materials or take much longer to build, if at all.

If these designs have inspired you, I encourage you to take a short survey and sign up for this email series and follow the steps to claim your free pergola plan and then to get the discount for the Guide to Building a Pergola in One Weekend. With all that information in hand, you will have what you need to create your own poolside pergola or spa pergola.