Monday, July 16, 2012

Getting Started Building a Pergola


Like many people these days you have decided that it is better to improve your home than to buy a new one. This summer it seems that every other house on my street is undergoing some kind of renovations. New roofs, walls, landscaping, driveways, gates, windows and painting are all getting done. The stagnant economy is keeping people where they are, but there is still a desire to improve and upgrade where you live. For a lot of you that means starting out with something simple that you can do yourself such as building a pergola.

Where will you place your pergola?

You’ve decided to build a pergola and create a shaded spot for an outdoor seating area. Most houses already have a concrete slab patio or a deck in the yard. Perhaps you have a flagstone or paver patio. Or maybe your yard is just all lush green grass. In any example you can easily secure pergola posts and build the structure anywhere you choose. A pergola can very easily be attached to the back of the house or be free standing. Create your seating area or outdoor kitchen where you can have the most privacy or to take advantage of the nicest views from your yard. 

Securing the posts to concrete

Since most people have a concrete slab off the back of their house creating a natural patio seating area, securing pergola posts to concrete is the most common and easiest method. Attach brackets to the concrete with tapcon screws and then secure your posts in the brackets. This method is perfect not only because it is sturdy but also because the brackets create the recommended one inch gap between the bottom of the post and the slab so that water won’t accumulate. 

What if you need to dig?

For yard with flagstone pavers or no hard surface patio at all, you will need to dig holes. Pavers are not strong enough for securing a pergola. Remove the pavers from the place where the posts will be and dig a hole. You will need to dig below the average frost level in your area to prevent frost heave - which happens as the ground freezes and then thaws - from pushing your pergola out of the ground. Pour concrete into the hole and then place Simpson strong tie brackets at the top making sure they are all level. When the concrete dries secure the posts to the brackets. 

Deck pergola installation.

The key to securing pergola posts to an existing wood deck is to use the framing as the attachment spot. You cannot just add a post to any single floor board because they may not bear the weight. Blocking needs to be added to the deck floor if that is your only choice to help spread the load. A metal anchor should be used as a mounting bracket for the posts.

Consider a pergola kit if you have a little extra money

Pergola kits are excellent alternatives to building your own. They are all pre-fabricated and partially put together in easy to ship sections. They come with complete instructions for you to follow. All the hardware necessary to secure your pergola to any surface will be included. You simply need to let the manufacturer know what you need. You will need one person to help you, but it will take much less time and effort than building from scratch.

Whether you choose a pergola kit or decide to build your own pergola, you will be very happy with the results. Pergolas are inexpensive and easy to install. Just one weekend of work and you will have added style and value to your yard. You will enjoy the pergola for many years.

Tuesday, July 10, 2012

Let's Talk About Pergola Permits


Before you get too far into planning your pergola building project, you must look into the possibility of obtaining a pergola building permit. Building permit applications are granted by your city building commission. Every city planning department has a section that handles building addition permits and they all have pages on their websites that can let you know if you might need to get one for a pergola.

Chances are about fifty fifty that you will need one. Some cities look at the simplistic design, lack of walls and complete roof and are note concerned. Others look at the fact that people will be sitting under the pergola or cooking or placing plants to grow on it and want to make sure it is built to carry it's load and not buckle or topple in bad weather or under normal wear and tear.

Don't stress if you do need a permit. All you need to do is sketch out where it will be on your property, fill in the dimensions and let them know exactly what type of wood or other material you will use. In other words, you just need to give them your pergola plans that you will be following.

There will be a small fee to apply for the permit. Again, it varies by city, but of the ones that want you to obtain a permit, some may then require a final inspection after it is done to make sure you followed everything you said you would in the application.

Do take the time to check! You don't want to find out after that you violated a regulation and have to tear it down. That will cost you a lot more money and hassle than the simple application process will!

Sunday, July 1, 2012

Fun with Pergola Roofs

As you think about the pergola design you would like to build in your yard, keep in mind how the roof will look from all sight lines.  Consider too, just how much shade you want it to provide and what is the best placement for you to take advantage of that shade from all possible sunshine angles. It can be quite easy to overlook the many details of your pergola roof but you really don’t want to fall into that trap!

In the photo above this redwood pergola rafters and slats are the same two inch width. This provides a uniform square pattern on the ground that is very appealing to the eye in combination with the concrete pavers. The slats are also placed quite close together to increase the shaded areas. While increasing the slat and or rafter count will increase the overall costs of the pergola, if the ultimate goal is to cool off a particularly hot and sunny spot, then it will be worth the small increase.

You should also put up some construction stakes and line to give yourself a preview of what your pergola will look like before you get started. If you have a two story house you want to get an idea of what a view like the one above would look like. Will the pergola roof block or distract from any existing views that you want to keep? What about your nearest neighbors? If there are no local home owner’s or permitting rules instructing you on height or view blocking limitations, you should still be a courteous neighbor and try not to build anything that will be an eyesore.

Finally, you should go an sit out where you want to build your pergola if the area is to be designed for seating. Look around you and see what your views will be like. Look up and see who is potentially looking down on you! What will the wind be like in that spot? Will you perhaps want to put up a partial lattice wall on any particular side for either privacy or wind protection?

 If you take the time to think about all these little details you will be even more happy with the pergola design you choose. Better to layout and preview your pergola plan twice, and only build it once than the other way around!

As always, for the best darn email tips and instructions on how to build a pergola, visit PergolaDIY.

Monday, June 25, 2012

Pool and Spa Pergola Ideas

Poolside Pergola - Corner Design
Vinyl Poolside Pergola – Corner Design

As you make your way around your neighborhood or the internet in your search for pergola plans and ideas for different possible designs, you might notice that they are quite popular structures to place around back yard water features. You can get very creative when thinking about where to place your pergola and what shape and size to use. The example above is a corner wrap design. It almost looks like two separate pergolas but the roof pieces do connect in the back. It is still a very simple design though with standard square posts on concrete, and single layer beams, rafters and slats. The overhang is quite short and end cuts are very basic.

Poolside Pergola - Rectangle six post design
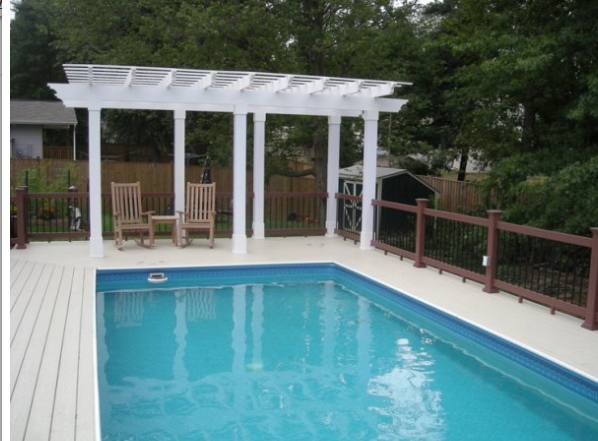
Vinyl Poolside Pergola – Rectangle Six Post Design

You will notice that the majority of waterside pergolas will be made with a white vinyl material. This is the best type for withstanding the excess moisture of a pool or spa. It is a little more expensive at first, but then upkeep is minimal with no cost. Just hose off the pergola to keep it clean, but you wont need to reapply stain or treat it. The pergola above on a deck at the end of the pool is designed to match the pool’s rectangle shape. Six square posts are secure to the deck. Again the roof design is simple though the edges of this one have a more sharply angled cut and longer overhang.


Cedar Poolside Pergola – Four Post Simple Design

There are times, of course, when wood is just what you happen to want and it also looks beautiful at the edge of a pool. The area surrounding the pool in this yard is a perfect compliment to the cedar pergola. The four post design is attached to the concrete with some nice base trim pieces and supporting knee braces between the beams and rafters that provide a more complete, elegantly curved look. The roof line is again, otherwise quite standard with just one layer of rafters and slats to provide just the right amount of shade for the seating area.


Curved Poolside Pergola

This pergola design is something you typically see at a resort. It is just there for style and does it ever work! The curved vinyl design set up on pillars provides a very regal boundary at the edge of the spa and pool seating area. There is no real shade being provided here since it is just a single line of posts holding up a minimal series of rafters on the curved beam. Extended trim pieces at the tops of the posts deliver additional style and support for the beam and rafters.


Simple Attached Vinyl Poolside Pergola

Bringing it back to a more useful example – the attached vinyl pergola above is a classic. The roof line is again quite simple, but the slats and rafters are cut a little thinner than usual and placed closer together to provide more shade.


Attached Vinyl Spa Pergola

Spa pergolas are truly inexpensive and easy to build. They typically have to cover a much smaller space such as the one above. The attached pergola with two square posts attached to the concrete only has 7 slats and 7 rafters so the material cost is quite low. The labor to build this would also be minimal. Two people could most likely put it up in one day.


Pine Wood Spa Pergola

Just like with pools, sometimes you still want to see wood around your spa, Pressure treated pine is the cheapest and as long as you are willing to spend a day every few years re-treating the wood it will last just fine. This is a very simple, four post square pergola with nice, thick roof pieces for maximum shade. This one could also be put up in one weekend by two people quite easily.


White Vinyl Spa Pergola with Deck

The spa pergola above is a little fancier than the others of course. This is a beautiful blend of different materials for the deck, fence and pergola. The posts are actually secured in the ground between flagstone pieces. You cannot properly secure a pergola on flagstone as it doesn’t provide sufficient stability. It’s best to remove the stone to dig holes for the posts. There are nice trim pieces added here on the posts and the top and the bottom including caps to match the fence posts. Like the previous two examples there is only one row each of 7 rafters and 7 slats so the basic pergola itself would not cost much more in materials or take much longer to build, if at all.

If these designs have inspired you, I encourage you to take a short survey and sign up for this email series and follow the steps to claim your free pergola plan and then to get the discount for the Guide to Building a Pergola in One Weekend. With all that information in hand, you will have what you need to create your own poolside pergola or spa pergola.

Wednesday, June 20, 2012

Build a Pergola in One Weekend – New and Improved!

If you are a regular visitor – first of all, thank you! – but you might have picked up on the notion that we wanted you to take a survey.

Have you clicked over on the mouse with the check mark? Yes? Well then, thank you again!

If not, please do. It wont hurt :-) Your email you provide to claim your free plan will remain secure and the answers you provide help us to see what our visitors need the most.

In fact, you might notice that the picture of the book on the top right of the sidebar has now changed.

That is because the How To Build a Pergola book has been upgraded to focus a little more sharply on just those topics submitted in the survey. Over 400 people have weighed in and they encouraged us to expand a couple of chapters and even add a whole new one.

There are some common concerns or obstacles that people seem to share about embarking on a DIY pergola project.

These are all easily solvable problems that are really not that scary at all. We know plenty of people who have succeeded in building a pergola without any issues.

We also know some people who have made one or two (or ten!) typical mistakes. We’ve put those lessons into the book so that you can learn from the blunders of others.

You know the old woodworking saying right?

Measure Twice Cut Once

Yeah, this is true. We have variations on that.

Make sure posts are level and true twice, secure them once.

Scout your site twice, build once.

I know these seem like they should be common sense and not worth noting BUT…..we’ve witnessed the consequences of forgetting those common sense details and it is not pretty (or cheap!)

Pick up a copy of the updated Guide here.

Friday, June 15, 2012

Wood pergola materials vary by price and appearance

Choosing which material to use to build your pergola is dependent on many factors. Budget, of course, is usually at the top  Prices can be so different even amongst the different timber varieties. For instance, in the drawing above there are 24 pieces of wood (4 posts, 8 knee braces, 4 beams, 8 rafters).  Pressure treated pine would total around $400. Cedar would total $1,000 and redwood could break any budget unless you live in area where it is readily available, then it could cost less than cedar! A similar vinyl pergola kit would run well over $1,000. So if you are determined to spend less than $1,000 is the pressure treated pine a valid option as far as durability and appearance compared to cedar or redwood?

Pressure treated pine definitely stands up to the durability test. As long as you make sure any ends you may have to cut to create your desired pergola design are also properly treated before final construction, then this very hard, solid wood will last for decades. We know of a properly drained set of pressure treated pine posts buried into concrete casings in the ground in an area of the country where the ground freezes that were still in fantastic shape after over twenty years. The old posts had to be removed to make room for a newer, larger pergola and even the timber that was in the ground was free of moisture damage.

The bigger difference between the materials is in their appearance. A pergola built from pressure treated pine will definitely look more rustic or natural. There could easily be visible knots in the wood. Now, the pieces can be either stained to a darker hue or painted, but that ads an extra level of ongoing maintenance as weather and wind will wear down the exterior layer and need freshening up. Cedar & redwood look beautiful and elegant on their own without any staining or painting needed. Natural oils protect  just as well as pressure treating.  If you are really determined to have the look of cedar or redwood, then shop around lumberyards for sales to try to bring the material cost down a little more.

Saturday, June 9, 2012

The Best Pergola DIY Tips Anywhere!

The best resource for information on how to build a pergola can be found after you spend just a few minutes of your time answering six survey questions. Once you complete the survey and opt in to the email series provided, you will be given a password that will provide you one time access only to two very valuable links.
  1. A free pergola plan
  2. A discounted version of the guide How To Build A Pergola In One Weekend
In addition to those, the email series you receive will also be very informative.
Here is a sneak peak of the seven email topics that will be sent out to help you get started on your own DIY pergola project:


Tools and Hardware Needed to Build
Most of the tools and some of the hardware you need are probably already in your garage or tool shed. Even if you do need to buy then, you will find they will come in handy for more than just this pergola project. We will give you a handy list to take with you tool shopping.

Securing Posts
We know this is one of the more intimidating steps in the building process. Don't worry - we will walk you through it. No matter which method you use, will give you the latest & greatest tips on how to secure your posts and never worry about rotting or warping or a strong wind blowing anything over!
Building Permits
Another yucky, scary topic that seems like a hassle more than anything, but you've got to handle it. Always keep in mind that you can have two possible sources of regulations in your area, Homeowner’s Associations and City Building Codes. Information on the possible impacts of both & how to work with them will be provided.

Material Selection
 We will give you a quick summary of the most used material types including the various woods and synthetic materials. Yes, some are better (and cheaper!) than others. Where you live & how you want to use your pergola could be the biggest influences.
Design Ideas
The possibilities for pergola designs are endless. We cover some of the most commonly used and provide some ideas that could spark your imagination beyond the typical uses.

Cost
This is the bottom to it all. Should you buy a kit to save building time and labor? How much would that be? What about if you do choose to build it yourself using a plan? How inexpensive can that really be in comparison? We’ve got that covered for you.

Additional Features
Even the most basic pergola can have a few little details added on for increased style and personality or to enhance its use. These additions can still keep within a budget very easily. We will cover a few of these ideas to get your creative juices flowing.

Surf on over and take the survey and claim your free pergola plan and don't forget that any plans you receive can be easily adapted to fit your own design needs.